Every time I see someone use french knots & they leave them like they are in the first section it kind of makes my heart hurt. Here is the thing. Is there anything wrong w/ this? Nope. But odds are if you are trying to stitch french knots to fill an area like sheep fleece you are probably not looking for gaps in its coat. You are looking for full & fluffy right!? So here is how to fix it or change it depending on the look you want.
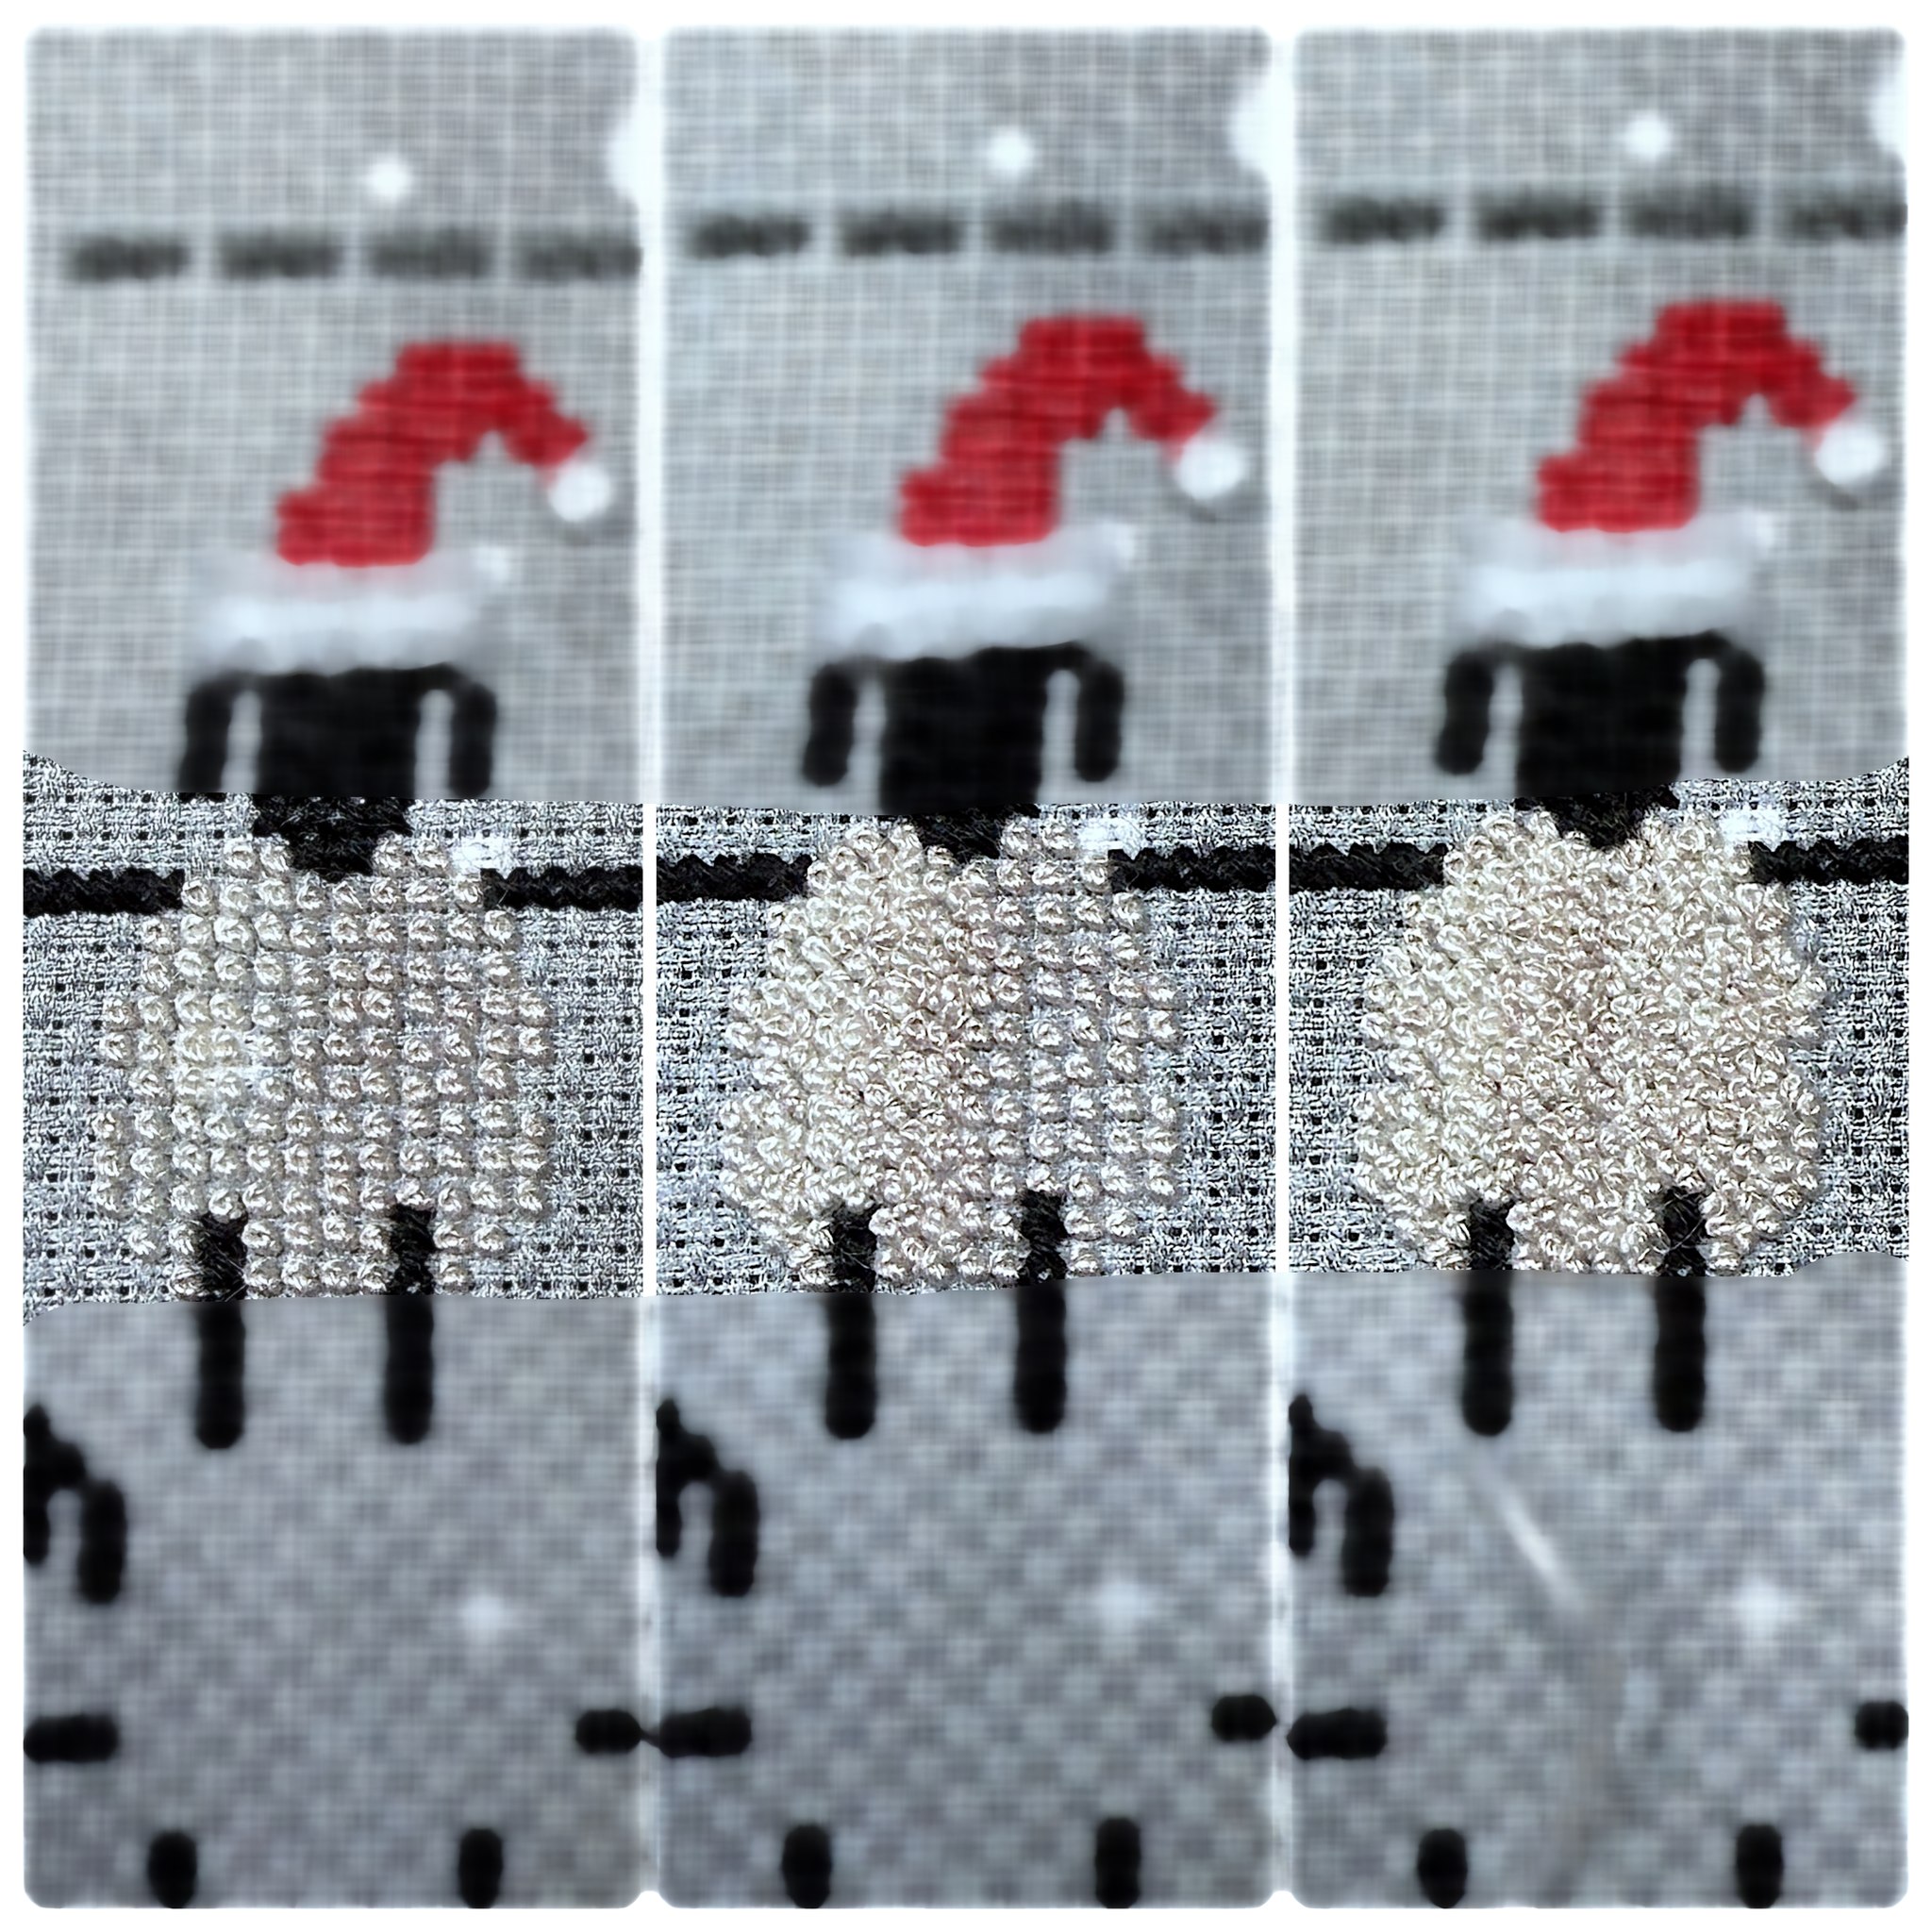
– If you have french knots that look like the 1st section ( left ) you are using too small of a french knot. Now I did it deliberately for this one but how many times you wrap your needle matters depending on the size count fabric you are using. This is 18 count w/ 1 wrap around the needle. Its to small to be used by itself. I WANTED tiny knots but I also knew I would have to fill in to make it more full. So for me this was a perfect start. A lot of people though leave it here. 1 (to small) knot per square & done. Please don’t stop here, your sheep will thank you.
– If you haven’t made this this far into stitching & you see it going like this Stop! cut the knots & start over. Add a wrap to your needle & try again. Also try not to pull really hard when you finish the knot as that will keep the knot a bit more fluffy. In general I find for anything between a 16 & a 20 count that 2 wraps nicely fills each square. If you have already gone to far and stitched the whole thing with knots that are to small its OK! Don’t panic. Just fill in the gaps. Sheep are not perfect so this is actually super easy. Just go in-between the knots you stitched & add one. It will fill in fast. You cant do it wrong. They will naturally fall into the spaces that are left between the other knots.
– Once you have all the gaps filled run your finger under where you are stitching the knots & press up.. If a gap appears put another knot in there till it doesn’t do that anymore.
Wa La! From sparse to fully.
I basically learned to do french knots by trial and error. But I recently ran across a video that I highly recommend a watch if you are trying to do french knots. This video is AMAZING! Its chalk full of info about french knots.
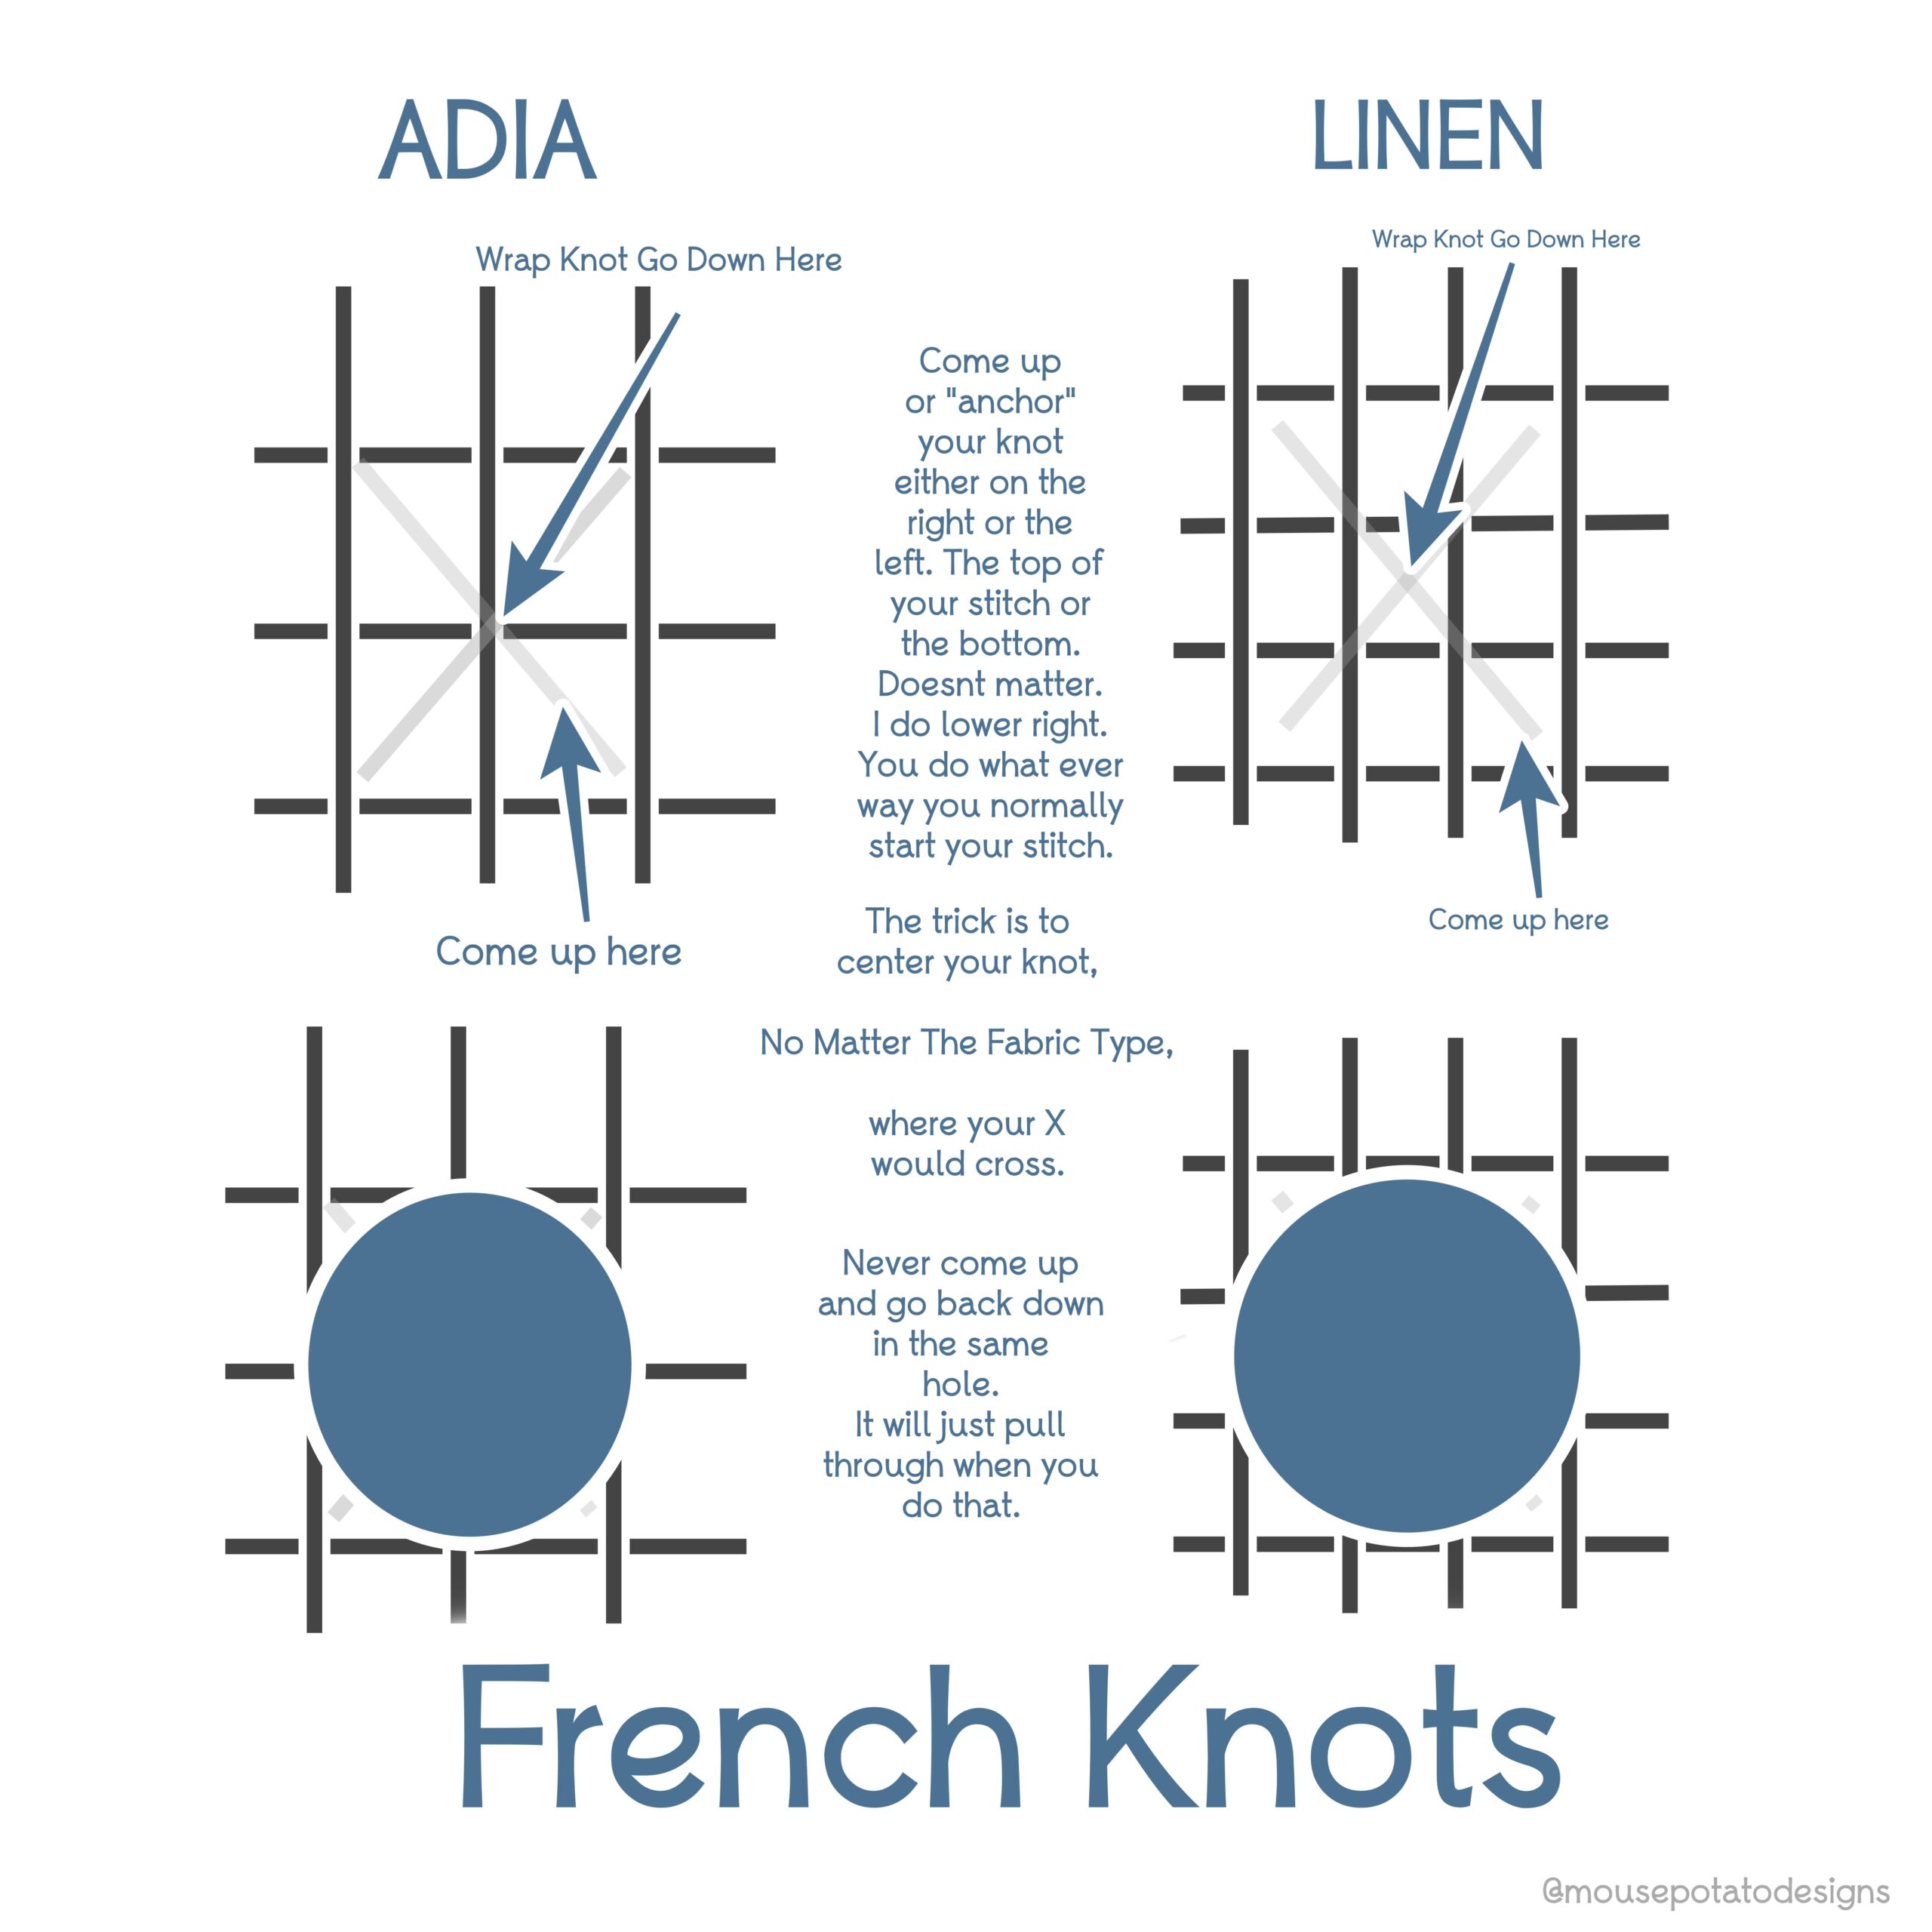
This is how I do my french knots now for my sheep and well anywhere else I put them. I am working on better photos and maybe a video to show this so please holler if you have questions but here is a basic view of it.  If you need a guide to where you need to fill in with french knots you can just go around the outer edge of the say sheeps body with just half stitches / and then they will be covered up once you do your french knots. I will work on photos and stuff though to do a better job of showing this as soon as I get a bit of time. Please don’t hesitate to ask questions though mousepotatodesigns@gmail.com anytime! The next photo down shows what I wrote by hand above using thread but I need to do better photos of this and a video. Anyways its the same thing as the flower center section below I just do it for everything now.

So my May Little Sheep Virtues is Wisdom. The sheep in this chart has 2 different colors in its fleece. I think its supposed to turn into a pattern but since I wanted to use french knots for the fleece I didn’t worry to much about the pattern. Figured I would get questions on how I did the 2 different colors so I tried to take some photos that show what I did.

1. I stitched the outline of the sheep and then fill it in completely with my lightest fill color so my darker color will pop against it. I ONLY fill in like this on looser weave fabrics like this 16 count aida. If you dont and you use a light color the darker background of the fabric will show around your french knots in spots. Also this helps support the knots from popping back out the back if you pull to hard as it makes the holes smaller.
2. This is what it looks like all filled in.
3. 3a. 3b. Next I decided to go with the darker first since there were fewer stitches of those. I loosely put the french knots about where it showed on the pattern -ish. Since I put the french knots in the holes at the corner of each cross stitch it is never exact since there are more holes than cross stitch sections ( if that makes sense ). I started out this way following the pattern as charted and then realized that it really didn’t matter LOL as if there was a pattern to it there was no way it was going to show up so I just kind of went randomly here and there with the darker color.
4. This is what it looks like after I have both the light and the dark french knots put in. Nice part is you can always go back and add a dark one here or a light one there if when you are done with the over all look something sticks out as off.
5. Wala! 2 different color fluffy sheep fleece. Don’t get hung up on perfect knots. Its a sheep.. they are slobs and rarely even bother picking hay out of their coats let alone have each curl in place.
UPDATE: I DO NOT DO MY FRENCH KNOTS THIS WAY ANYMORE – I will leave this though so you can see another way you CAN do them though if you want to


Thanks for the video on French knots. I was wondering if you cross stitched the body in first. The video answered my question. Fill more confident in doing them now. As soon as I finish stitching the project I am doing for my brother-in-law, and stitch something cute, I will send a photo. Love your videos!❤️
I just love, love, love the sheep with the French knots and going forward am not going to be able to “unsee” that “look” in any sheep designs. LOL. I’m going to try your technique in 2023. Thank you so much for your generosity and willingness to share your love of stitching with us.
LOL Have fun!!! Sheep just gotta be fluffy ya know!! All the best in 2023! Happy Stitching!! Felicia ❤️